Seeing that “Service Battery Charging System” warning light pop up can be a real scare, but don’t worry! This guide will walk you through fixing the problem. We’ll cover everything from what might be causing the light to come on (things like a bad alternator or battery) to how to keep your battery healthy for years to come. Whether you’re a car whiz or prefer to leave it to the pros, we’ll give you the info and steps you need to get that annoying light to go away. For more information on battery voltage, check out this helpful article on average car battery voltage. Let’s get started and get your car running smoothly again!
Battery Charging System Troubleshooter: A Complete Guide
That “Service Battery Charging System” warning light? Yeah, it’s a bit of a downer, but don’t let it get you down. Your car’s electrical system has a hiccup, but we can figure this out together. Think of this guide as your friendly neighborhood mechanic, offering easy-to-understand steps to fix the problem or, at the very least, know what questions to ask a pro. Let’s discuss common problems and solutions for issues in your car’s battery charging system.
Decoding Your Car’s Electrical System: It’s Not Rocket Science!
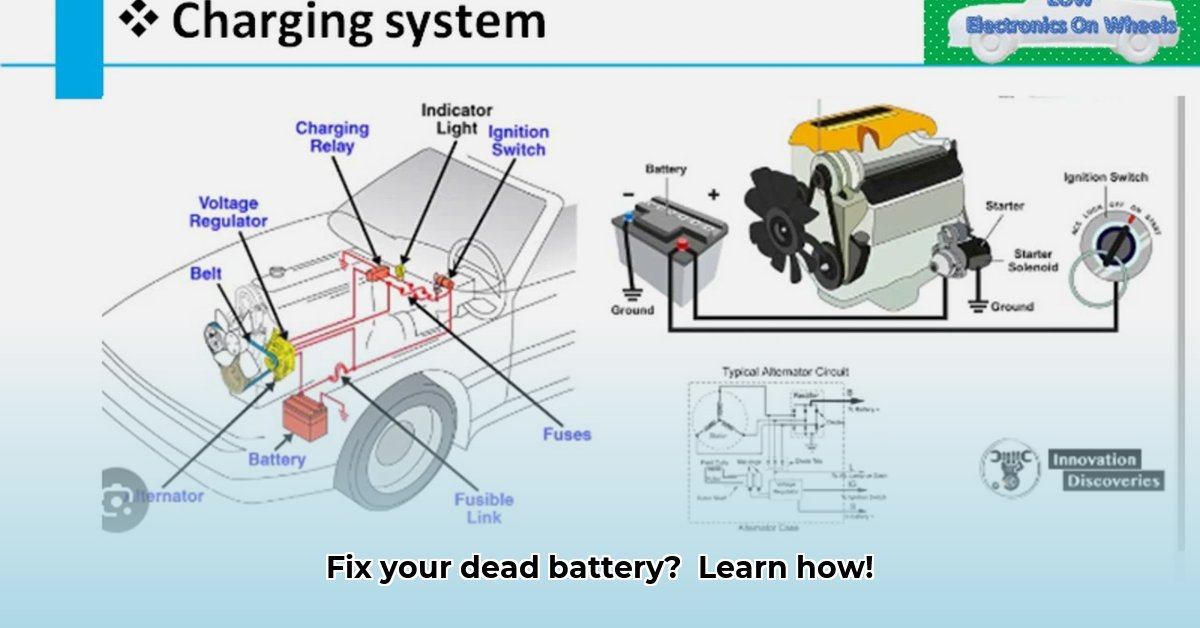
Your car’s battery charging system isn’t some mysterious black box. It’s a team effort between a few key players: the battery (your car’s power source), the alternator (the battery’s recharger), the wires connecting everything (the power lines), and the car’s computer (the ECU – think of it as the brain of the operation). If any of these parts are acting up, that warning light is your car’s way of saying, “Hey, I need help!” Understanding the electrical flow is key to battery health.
Troubleshooting Steps: A DIY Approach (Most of the Time!)
Before you panic and call a tow truck, let’s try some simple checks. You might just be surprised how easy it is to fix this yourself and save some serious cash. These steps can help you identify if there is a faulty car battery or other problems.
Step 1: The Visual Inspection – A Quick Look Can Go a Long Way
Start with the easy stuff. Pop the hood and take a peek. Look closely at the battery terminals – those metal connectors. See any green, crusty stuff? That’s corrosion, and it’s an electricity blocker. Grab a wire brush and a baking soda and water mixture (a paste works best) and gently scrub the terminals clean. While you’re at it, give the serpentine belt (the big one that wraps around various engine parts, including the alternator) a once-over. Is it cracked, frayed, glazed, or obviously worn? Check the belt tension; it shouldn’t have excessive slack. A simple visual check often points right to the problem. Also, inspect the battery case for any physical damage like cracks or bulging, which could indicate internal issues.
Step 2: The Voltage Test – Getting a Little More Technical (But Still Easy!)
This step requires a multimeter – a handy tool that measures voltage. You can grab one at any auto parts store for a reasonable price. First, turn off your car’s engine and let it sit for at least an hour (this allows the surface charge to dissipate). Now, connect the multimeter to the battery terminals and check the voltage. A fully charged battery should read around 12.6 volts or higher. Now, start the engine and check the voltage again. It should jump up, typically to between 13.5 and 14.7 volts. If the voltage is way lower than this range after starting, or if it’s significantly higher (over 15 volts), your alternator might be on its last leg or the voltage regulator might be faulty. A voltage test determines car battery health. Note: If the voltage drops significantly while starting the engine, it could point to a weak battery unable to handle the load.
Step 3: The Fuse Check – A Small Part, a Big Impact
Remember those small, cylindrical fuses? These little guys protect your car’s circuits from electrical overload. Check your owner’s manual – it’ll tell you exactly which fuses relate to your charging system (often labeled “alternator,” “battery,” or “ECU”). A blown fuse (visible as a broken wire inside the fuse) is a super easy fix, requiring just a replacement fuse of the correct amperage. Don’t just replace it without investigating why it blew, though; repeated fuse failures indicate a short circuit. This step is important for checking proper fuse amperage.
Step 4: The OBD-II Scanner – Talking to Your Car’s Computer
If you’re feeling a bit more adventurous, an OBD-II scanner (another relatively inexpensive tool from any auto parts store) can read diagnostic trouble codes (DTCs) from your car’s computer. These codes offer clues about what might be wrong, but sometimes they need a little extra interpreting. Common codes related to the charging system include P0562 (Low System Voltage), P0620 (Generator Control Circuit Malfunction), and P0563 (High System Voltage). Many free apps and online resources can help decipher the DTCs. Be aware that some codes can be misleading, so it’s essential to cross-reference them and consider other symptoms.
Step 5: Load Testing the Battery
Many auto parts stores offer free battery load testing. This test applies a heavy electrical load to the battery to simulate starting the engine and checks how well the battery holds up under pressure. A load test can reveal a battery’s inability to deliver sufficient current, even if it shows a good voltage reading. Think of it like a stress test for your battery.
Step 6: Checking for Parasitic Drain
Even when the car is off, some systems continue to draw a small amount of power. An excessive parasitic drain can slowly discharge the battery, especially if the car sits unused for extended periods. You can use a multimeter to measure the parasitic draw (with the car off and all accessories disconnected). A normal parasitic draw should be less than 50 milliamps. Higher readings indicate a problem that needs further investigation.
Step 7: Inspecting the Alternator Belt and Pulley
Beyond a simple visual check, ensure the serpentine belt is properly aligned and tensioned. A loose belt can slip, reducing the alternator’s output. Also, inspect the alternator pulley for any signs of damage or wear. A damaged pulley can cause the belt to slip or even shred.
Step 8: Testing the Alternator with a Multimeter (More Advanced)
While the initial voltage test provides some information, a more thorough alternator test involves checking the AC ripple voltage. A small amount of AC voltage is normal, but excessive AC ripple indicates failing diodes inside the alternator. To perform this test, set your multimeter to AC voltage and measure the voltage between the alternator’s positive terminal and ground. A reading above 0.5 volts AC suggests a faulty alternator. This test requires some electrical knowledge and caution.
Step 9: Checking Ground Connections
Poor ground connections can cause all sorts of electrical problems, including charging issues. Inspect the ground cables connected to the battery, engine block, and chassis for corrosion or looseness. Clean and tighten these connections to ensure a good electrical path.
Step 10: Scan For Trouble Codes After Repairs
After any charging system repair, use the obd2 scanner to check which codes remain active. In addition, clear old codes to confirm which codes are currently active.
Step 5: When to Call in the Pros – Knowing Your Limits
If you’ve tried the above steps and the “Service Battery Charging System” light is still glaring at you, or you experience other worrisome issues, it’s time to bring in a professional mechanic. Some problems, like a faulty alternator, a complex parasitic drain, or a computer issue (ECU problems), need specialized tools and expertise. Don’t risk further damage by trying to tackle something beyond your skill level. Remember to schedule a visit with a professional mechanic if DIY steps fail. Mechanics have access to advanced diagnostic equipment and can accurately pinpoint the problem and perform the necessary repairs.
The Usual Suspects: Common Causes of Charging System Woes
Alternator Issues: This is a common culprit; think of the alternator as the heart of your charging system. A failing alternator can’t keep the battery topped up, leading to low voltage and that dreaded warning light. Common causes of alternator failure include worn brushes, faulty voltage regulator, and damaged diodes.
Battery Problems: Even a seemingly healthy battery can unexpectedly give up the ghost. Batteries have a lifespan, after all (typically 3-5 years). A weak battery struggles to hold a charge, resulting in slow cranking or even a no-start situation. Sulfation (build-up of lead sulfate crystals) and internal shorts are common battery killers.
Wiring Woes: Damaged, corroded, or loose wires can interrupt the electrical flow, preventing proper charging. Sometimes, a simple reconnection or replacement of a small section of wire can solve the problem. Rodents can also damage wiring.
Computer Confusion (ECU Problems): Many modern cars use sophisticated computer systems to regulate the charging process. If the ECU malfunctions, all sorts of charging problems can occur, frequently showing up as inconsistent voltage or warning lights. Software glitches or hardware failures within the ECU can cause charging system issues.
I am a writer who loves renewable energy, with a focus on sustainable living, renewable energy, and eco-friendly innovation. With a passion for environmental awareness and a desire to explore the latest trends in green technology, corporate sustainability, and climate action. Through in-depth storytelling