Want a cheaper, greener way to heat and cool your home? This guide provides a comprehensive walkthrough of building your own geothermal system. From initial planning and trenching to connecting the heat pump and ongoing maintenance, we’ll cover everything you need to know to harness the earth’s energy and save money while going green.
1. Planning Your Geothermal Project
Before you pick up a shovel, meticulous planning is essential for a successful geothermal installation. This stage sets the foundation for the entire project, so careful consideration is key.
Sizing Your System: Matching Your Home’s Needs
Accurately determining your home’s heating and cooling requirements is paramount. This involves a professional heat load calculation, which considers factors like your home’s size, insulation, and local climate. This calculation determines the size of your geothermal heat pump and the length and layout of your trench field. An incorrectly sized system can lead to inefficiency and discomfort.
Site Assessment and Trench Design: Mapping Your Geothermal Landscape
Thoroughly assess your property to identify the optimal location for your trenches. Consider factors like soil type, groundwater depth, existing landscaping, and underground utilities. A horizontal slinky loop design is often preferred for maximizing pipe length in smaller areas, but other designs might be more suitable depending on your property. Consult local building codes for required setbacks and obtain the necessary permits before proceeding.
Materials and Tools: Gathering Your Geothermal Arsenal
Assemble all necessary materials and tools before you begin. This includes high-density polyethylene (HDPE) pipe, a geothermal heat pump unit, a manifold, insulation, fittings, backfill material, and trenching equipment. Renting a trencher is usually the most cost-effective option for digging. Creating a comprehensive checklist can prevent delays and ensure a smooth installation process.
2. Excavation and Trenching: Unearthing the Earth’s Energy
With your plan in place, it’s time to break ground. This phase involves careful excavation and precise trenching to house your geothermal piping.
Trench Layout and Soil Considerations: Preparing the Ground
Mark the trench locations accurately, following your planned design. Before digging, contact your local utility companies to mark underground lines. This crucial step prevents potential damage and ensures safety. Understand your soil type, as this impacts the trenching process. Rocky soil may require specialized equipment, while clay-heavy soil might need moisture adjustments.
Choosing Excavation Equipment: The Right Tools for the Job
Select the appropriate excavation equipment based on your project size and soil conditions. Mini-excavators or backhoe loaders are suitable for smaller projects, while trenchers are better for larger installations. Chain trenchers are effective in soft soil, while wheel trenchers are designed for rocky terrain. Consider rental costs and obtain quotes from multiple suppliers.
Trenching Techniques and Best Practices: Digging with Precision
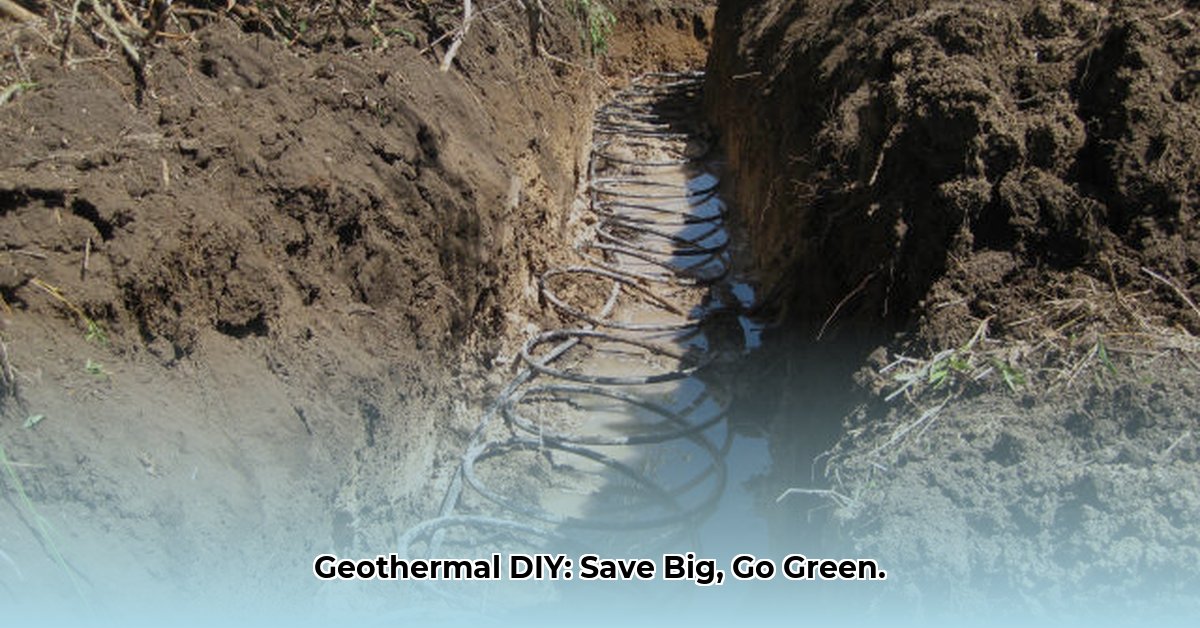
Excavate the trenches to the recommended depth (typically 4-6 feet) and width (1-2 feet). Maintain a slight slope for drainage if necessary. If space is limited, use a slinky loop configuration to maximize pipe density within the trench. Precision is crucial during excavation to ensure proper pipe installation and system efficiency.
3. Installing Geothermal Piping and Manifold: Connecting the Dots
This stage focuses on installing the geothermal piping and manifold system, the core components of your geothermal setup.
Geothermal Piping: Laying the Foundation
Carefully unroll and lay the HDPE pipe in the trenches, avoiding kinks or sharp bends, which can restrict flow. Use a pipe fusion machine to create seamless, leak-proof connections between pipe sections. If using a slinky loop design, maintain proper spacing between loops for optimal heat transfer. Flush the pipes with water to remove debris before backfilling.
Manifold System: The Geothermal Distribution Hub
Install the manifold, the central distribution point for the geothermal fluid. You can build a DIY manifold using PVC fittings and control valves, or choose a pre-built, insulated manifold for easier installation. Locate the manifold indoors, near the heat pump, for convenient access and control.
4. Connecting the Heat Pump and Completing the System: Harnessing the Earth’s Power
This phase involves connecting the geothermal heat pump and finalizing the system, bringing your geothermal project to completion.
Heat Pump Connection: Integrating the Core Component
Connect the manifold to the geothermal heat pump using specialized refrigerant lines. This critical step requires precision to prevent leaks. Consult a qualified HVAC technician for this task, as refrigerant leaks can be harmful to the environment and damage the system.
System Testing and Commissioning: Ensuring Optimal Performance
Pressure test the system to ensure there are no leaks. Purge the system to remove air and other contaminants that could hinder efficiency. Commission the system by starting the heat pump and verifying its operation. Set up the control system to regulate temperature and optimize performance. Professional assistance is recommended for this process to ensure proper calibration.
Ongoing Maintenance: Preserving Your Investment
Regular maintenance is essential for long-term system health and efficiency. Check refrigerant levels, clean air filters, and inspect the ground loop periodically. Consult a qualified technician to establish a maintenance schedule and address any issues promptly. Proper maintenance can likely extend your system’s lifespan and maintain optimal performance.
5. DIY vs. Professional Installation: Knowing Your Limits
While DIY geothermal installation offers potential cost savings, it’s essential to be realistic about your capabilities. Complex aspects like system sizing, loop field design, and heat pump connection often require professional expertise. Consulting qualified professionals ensures proper installation and avoids potential issues that could compromise system efficiency and longevity.
Cost Breakdown (Estimated Ranges)
| Task | Estimated Cost | Potential DIY Savings |
|---|---|---|
| Trenching | $2,000 – $5,000 | $1,000 – $2,500 |
| Piping | $1,000 – $2,000 | $500 – $1,000 |
| Manifold | $500 – $1,000 | $250 – $500 |
| Heat Pump Installation | $2,000 – $4,000 | $1,000 – $2,000 |
| Total Potential Savings | $2,750 – $6,500 |
Note: Costs can vary significantly based on location, system size, soil conditions, and local labor rates.
Combining Geothermal with Solar: Maximizing Efficiency
Integrating your geothermal system with solar panels can further reduce your energy consumption and environmental impact. This hybrid approach can significantly enhance your home’s energy independence.
A Final Word: Embracing Geothermal Energy
DIY geothermal installation is a significant undertaking, but the potential rewards are substantial. While this guide provides comprehensive information, consulting with qualified professionals is crucial throughout the process. Their expertise can ensure a safe, efficient, and properly functioning system. Remember, ongoing research in geothermal technology constantly evolves, so staying informed about the latest advancements is always beneficial.
- Generate Free Electricity for Home From Renewable Sources - February 18, 2026
- Micro-Hydro Offers Cheapest Home Electricity if You Have a Stream - February 17, 2026
- How To Get Free Electricity At Home Through Sustainable Energy - February 16, 2026
