Escaping the constant drain of utility bills and truly understanding how to create free electricity at home feels like a distant dream for many. Yet, with a strategic approach to renewable resources, it’s a completely achievable reality. Imagine the satisfaction of knowing your lights, appliances, and devices are powered by the sun, wind, or even your own property’s natural waste, drastically cutting or eliminating your monthly energy costs. This isn’t just about saving money; it’s about gaining energy independence and contributing to a healthier planet.
This guide will take you deep into the practicalities of generating your own power, moving beyond the headlines to the actual steps, costs, and considerations for each major home-based renewable system.
At a Glance: Your Path to Home Energy Independence
Unpack 5 Key Renewable Options: From solar panels to micro-hydro, understand what each system entails.
Assess Suitability: Learn how to determine if your property is a good fit for specific technologies.
Navigate the Process: Get step-by-step insights into planning, choosing, and installing your chosen system.
Decipher Costs & Benefits: Understand the upfront investment and long-term financial advantages.
Make an Informed Decision: Equip yourself with the knowledge to select the best “free electricity” solution for your home.
The Core Question: Can You Truly Create “Free” Electricity?
Let’s be clear: “free electricity” refers to the long-term operational cost, not the initial setup. Generating your own power through renewable sources like solar, wind, biomass, or micro-hydro involves an upfront investment. However, once installed, these systems tap into perpetually available natural resources, meaning the “fuel” for your electricity is indeed free. This significantly reduces your reliance on grid power, offering environmental benefits, greater control over your energy supply, and often, the potential to even sell excess electricity back to your utility company. The goal isn’t magic, but smart, sustainable investment.
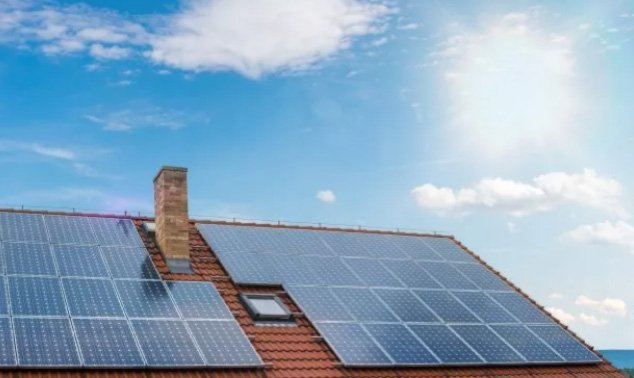
Solar Panels: Harnessing the Sun’s Power from Your Rooftop
Solar energy is often the first thought when considering how to create free electricity, and for good reason. It’s widely applicable and increasingly efficient.
Is Your Home Sun-Ready? The Suitability Check
Before you even think about panel types, you need to confirm your property’s solar potential. The primary requirement is receiving at least four hours of peak sunlight per day. This isn’t just about sunny weather; it’s about unobstructed sun exposure. Walk around your property throughout the day. Are there tall trees, neighboring buildings, or even architectural features that cast significant shade on your roof or potential ground-mount areas? Consulting a peak sunlight map for your region can provide a general idea, but a professional assessment will offer precise data for your specific site.
Making It Happen: Step-by-Step Solar Installation
Schedule a Professional Consultation: This is your critical first step. Reputable solar power companies will assess your roof’s slope, direction (south-facing is generally ideal in the Northern Hemisphere), and overall efficiency potential. They can also identify any structural issues that might need addressing.
Choosing Your Panel Type: Not all solar panels are created equal. Your budget, available space, and desired efficiency will guide your choice:
Monocrystalline: These are the sleek, black panels you often see. They boast the highest efficiency, around 20%, meaning they generate more power in a smaller footprint. This makes them ideal for homes with limited roof space. However, they are also the most expensive.
Polycrystalline: Recognizable by their blue, crystalline appearance, these panels are more affordable than monocrystalline. Their efficiency typically sits around 16%. They require slightly more space for the same output and have lower heat tolerance, meaning their performance can dip slightly on very hot days.
Thin Film: The most flexible and cheapest option, thin-film panels are less common for residential use due to their lower efficiency (7-13%) and larger space requirements. They can be good for unique applications or very large, unobstructed areas.
Explore Financing & Incentives: Don’t assume the upfront cost is entirely out-of-pocket. Many electric providers offer rebates, and federal, state, and local governments often have incentives (like tax credits) to encourage renewable energy adoption. Ask your solar consultant about these options.
Installation & Conversion: Solar panels generate direct current (DC) electricity. Your home appliances run on alternating current (AC). An inverter is a crucial component that converts DC to AC. The panels are installed on a mounting system (either on your roof or a ground-based array). While DIY kits exist, professional installation ensures safety, compliance with local codes, and optimal system performance.
The Numbers: What to Expect
The average upfront cost for a residential solar system typically ranges from $15,000 to $20,000. This can vary significantly based on system size, panel type, and installation complexity. A major benefit, however, is the ability to sell any extra electricity you generate back to the electric company through net metering, turning your energy independence into a potential income stream. Imagine Mrs. Henderson, whose Arizona home not only covers its own electricity needs but also earns her credits on her utility bill during peak summer months.
Small Wind Systems: Catching the Breeze for Power
If your property isn’t ideal for solar, or if you live in a consistently windy area, a small wind turbine might be your answer to how to create free electricity.
Is Your Property Windy Enough? The Suitability Check
Wind power requires specific environmental conditions and adherence to local regulations:
Zoning Restrictions: This is often the biggest hurdle. Many localities have strict height limits for structures. Critically, a wind system typically needs to be 30 feet (9.1 m) higher than the tallest structure within 500 feet (150 m) to capture unobstructed wind. Common height limits for residential turbines are around 35 feet (11 m), so carefully check your local zoning laws.
Average Wind Speed: You need a consistent breeze, not just occasional gusts. Your property should have an average wind speed of 14 mph (23 km/h) or more. Consult local wind speed maps or, for precision, consider a professional wind assessment for your specific site.
Calculating Your Turbine Needs
To determine the minimum turbine blade diameter (D) required for your annual energy output (AEO), you can use this formula: AEO = (0.01328)D^2V^3
Where:
AEO is your desired annual energy output in kilowatt-hours per year (kWh/year).
D is the turbine blade diameter in feet.
V is the annual average wind speed in miles per hour.
This formula helps you size a turbine appropriately. For instance, a farmer in the plains of Nebraska, aiming to cover significant energy usage with a high average wind speed, would use this to ensure their turbine is capable.
Procurement & Installation
Once you’ve done your homework on suitability and sizing, you can purchase the turbine and necessary components from a local renewable energy supplier or specialized online vendors. Professional installation is highly recommended due to the height, structural requirements, and electrical connections involved.
The Wind Power Bill: What It Costs
Small wind systems are generally priced around $5,120 per kilowatt of generating capacity needed. While a substantial upfront investment, a properly sited and installed system can provide reliable power for decades.
Biomass & Biogas: Turning Waste into Watts
For properties that generate a lot of organic waste, biomass or biogas systems offer a unique path to how to create free electricity, or at least free heat and cooling.
Who Benefits Most? The Ideal Property
These systems are particularly suitable for properties that naturally produce significant amounts of:
Wood chips
Timber offcuts
Paper
Old crops
Sewage
Animal manure Farms are prime candidates for biogas systems due to the consistent availability of animal waste.
The Conversion Process: From Waste to Energy
Biomass and biogas systems work by collecting organic waste materials in a specialized container, often partially underground. Through either direct combustion (biomass) or anaerobic digestion (biogas), these materials break down to produce gases, primarily methane and carbon dioxide.
Biogas Systems: These systems harness the methane produced from the decomposition of organic matter. Burning this methane is environmentally preferable to simply releasing it into the atmosphere, as methane is a potent greenhouse gas. The generated gas can then be used for heating, cooling, and cooking, significantly reducing your dependence on conventional energy sources for these functions. While direct electricity generation is possible, these systems more commonly offset other energy demands.
Professional assessment is highly recommended for designing and installing these complex systems, ensuring they are efficient, safe, and compliant with environmental regulations. Imagine John’s dairy farm, where a biogas digester converts tons of daily cow manure into fuel for heating his barns and even powering some farm equipment, drastically cutting his natural gas bill.
Investment Snapshot: Understanding the Costs
The cost for biomass or biogas systems typically falls between $3,000 and $4,000 per kilowatt of capacity. Biogas systems tend to be slightly more expensive due to their specific biological processes. While the upfront costs can be substantial, these systems are known for their low maintenance requirements once operational, making them a long-term, cost-effective solution for managing waste and generating energy.
Micro-Hydro Systems: Tapping Into Flowing Water
For homes with the right natural features, a micro-hydro system is one of the most consistent ways to create free electricity.
The Prerequisite: A Rushing Stream
The most critical factor for a micro-hydro system is the presence of an existing stream with reliable water flow on your property. This isn’t just about having water; it’s about having enough drop and volume.
Professional Assessment is Key: Head and Flow
You absolutely need a professional to inspect your stream. They will measure two crucial parameters:
“Head”: This refers to the vertical distance the water falls from the intake point to the turbine. More head generally means more potential energy.
“Flow”: This is the quantity of water moving through the stream, typically measured in gallons per minute or cubic feet per second. More flow equals more power.
Both head and flow are essential for determining the viability and sizing of a micro-hydro system.
Navigating Permits & Environmental Impact
Generating power from a stream often involves interacting with public waterways. You’ll almost certainly need to obtain a permit from your county or local authorities. This process often requires considering water rights (who owns the right to use the water) and assessing the environmental impact on native species and the aquatic ecosystem. This step can be complex and time-consuming, but it’s non-negotiable.
System Sizing: Matching Your Needs
Your micro-hydro system should be selected to generate slightly more watts than your monthly home usage. This ensures you have ample power, with a buffer for fluctuations or increased demand. The Miller family, with a small creek running through their wooded property, found that by carefully measuring their household’s average monthly consumption, they could install a system that not only met their needs but also provided a small surplus.
Long-Term Payoff: Durable & Low Maintenance
Micro-hydro systems are a significant upfront investment, typically costing between $1,500 and $2,000 per kilowatt. However, they are renowned for their durability, often lasting for decades with little to no maintenance once installed. The consistency of water flow, unlike the variability of sun or wind, often makes them a highly reliable energy source. Reducing your energy consumption can also lower the initial system size needed, further cutting costs.
For a broader understanding of how these and other methods fit into a comprehensive strategy for energy independence, you can Learn how to generate free electricity. That guide offers a wide-angle view, complementing this deep dive into specific generation methods.
Generators: Your Reliable Backup (Not a Primary Source)
While not a primary method for creating “free” electricity in the sustainable sense, generators are a vital component of home energy independence, serving primarily as a backup electricity source when your main generation system (or the grid) fails.
Clarifying Their Role
It’s crucial to understand that generators are not intended to be your everyday power supply. They consume fuel and contribute to emissions, making them unsuitable for continuous, primary power generation if your goal is sustainable, free electricity. Their value lies in providing peace of mind during outages.
Choosing Your Generator: Diesel or Biodiesel
You’ll generally find two main types for residential use:
Diesel Generators: These are common and generally more fuel-efficient than gasoline-powered alternatives, though they tend to have a higher upfront cost.
Biodiesel Generators: Offer a more environmentally friendly fuel option, running on renewable biodiesel.
Both types are available as either portable units (which you move into place and connect manually during an outage) or permanent installations (which are wired into your home’s electrical system and can often start automatically).
Realities of Generators: Practical Considerations
Noise: Generators, especially larger ones, can be quite noisy when operating, which is a factor to consider for both your comfort and your neighbors.
Fuel Costs: While useful for backup, the ongoing cost of diesel or biodiesel can add up if used frequently, making them expensive to run as a primary power source.
Maintenance: They are generally simple to maintain, requiring regular oil changes, filter replacements, and occasional test runs to ensure readiness.
Cost Insight
The cost of generators ranges from $3,000 to $10,000, with portable generators being the cheapest option. Permanent, whole-home standby generators represent the higher end of this spectrum due to their capacity and installation complexity.
Your Free Electricity Playbook: Making the Right Choice
Deciding how to create free electricity isn’t a one-size-fits-all endeavor. It depends entirely on your specific circumstances, resources, and goals. Here’s a framework to guide your decision-making:
A Practical Decision Framework
Assess Your Property’s Natural Resources:
Sun: Do you get 4+ hours of unobstructed peak sunlight daily? (Consider solar)
Wind: Do you have average wind speeds of 14 mph+ and no prohibitive zoning restrictions for height? (Consider small wind)
Waste: Do you generate significant organic waste like wood, crops, or animal manure? (Consider biomass/biogas)
Water: Do you have a consistently flowing stream with sufficient head and flow? (Consider micro-hydro)
If none of these are abundantly present, primary generation might not be feasible, and focusing on energy efficiency might be a better first step.
Evaluate Local Regulations & Permits: Research local zoning laws for wind turbines, building codes for solar, and environmental permits for hydro or biomass systems. This step can be a deal-breaker.
Calculate Your Energy Needs: Look at your past utility bills. How many kilowatt-hours (kWh) do you use per month? This helps you size your system appropriately to avoid overspending or under-powering.
Consider Upfront Costs vs. Long-Term Savings: Each system has a significant initial investment. How does that compare to the projected savings over the system’s lifespan? Factor in potential rebates, tax credits, and the resale of excess power.
Professional Consultation is Step Zero: For almost every system, getting a professional assessment specific to your property is the most important first action. They can provide accurate data, discuss regulations, and offer tailored recommendations.
Your Quick Start Guide to Generating Home Electricity
Identify Your Most Abundant Natural Resource: Which energy source (sun, wind, waste, water) does your property offer in spades? This is your most promising starting point.
Research Local Incentives & Restrictions: Before you get too deep, understand what your local government and utility company offer (or prohibit).
Get a Professional Assessment: Contact a specialist in your chosen renewable energy field. Their insights are invaluable.
Budget & Explore Financing: With an estimated cost in hand, look into loans, green energy financing, and any remaining grants or rebates.
Plan for Installation: Work with your chosen installer to schedule and oversee the project, ensuring all permits are in place.
Quick Answers to Common Questions
Q: Is “free electricity” truly free, or are there hidden costs?
A: “Free electricity” refers to the long-term operational cost. There are significant upfront investment costs for equipment and installation. Once operational, the “fuel” (sun, wind, water) is free, making ongoing electricity generation cost-free. Maintenance is generally low for most systems, but should be factored into long-term planning. Q: Can I combine different renewable energy systems for my home?
A: Absolutely. A hybrid approach, combining systems like solar and small wind, can often provide a more consistent and reliable power supply. For example, on cloudy, windy days, the wind turbine can pick up the slack from the solar panels, and vice versa. This often requires careful system integration by a professional. Q: How much maintenance do these systems typically require?
A: Maintenance varies by system:
Solar Panels: Generally low, requiring occasional cleaning and inverter checks.
Small Wind Systems: Moderate, involving annual inspections of blades, bearings, and electrical components.
Biomass/Biogas: Low, mostly ensuring waste supply and system checks.
Micro-Hydro Systems: Very low, often just requiring periodic debris clearing from the intake.
Generators: Moderate, requiring regular fuel, oil changes, and test runs to ensure readiness. Q: What’s the biggest barrier to entry for most homeowners wanting to create free electricity?
A: The most common barriers are the significant upfront cost of installation and the specific suitability of a property for a given renewable technology (e.g., not enough sun, not enough wind, no stream). Local zoning restrictions and the complexity of permitting can also be major hurdles.
Taking the First Step Towards Energy Independence
The dream of generating your own power and drastically cutting your utility bills is within reach. While it requires an investment of time, research, and capital, the long-term benefits of energy independence, reduced environmental impact, and consistent power supply are undeniable. Your journey to creating free electricity starts with a critical assessment of your property’s unique resources and a conversation with the right experts. Take that first step: identify your most promising natural resource and seek out a professional consultation to turn that dream into a tangible plan.
I am a writer who loves renewable energy, with a focus on sustainable living, renewable energy, and eco-friendly innovation. With a passion for environmental awareness and a desire to explore the latest trends in green technology, corporate sustainability, and climate action. Through in-depth storytelling