Imagine harnessing the relentless flow of a nearby stream to power your home, breaking free from utility bills and embracing true energy independence. That vision isn’t just a dream; it’s entirely achievable when you learn how to make a water wheel that generates electricity right from your backyard. Building your own micro-hydro system means tapping into one of the world’s oldest and cleanest power sources, delivering continuous, 24/7 electricity directly to your doorstep.
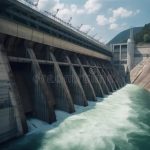
No need for massive dams or complex infrastructure; a well-designed, small-scale setup can easily handle the basic needs of an off-grid cabin or supplement a grid-tied home. It’s about leveraging the simple, consistent power of moving water to spin a generator, transforming kinetic energy into usable electricity.
At a Glance: Powering Your Home with a Water Wheel
- Continuous Power: Enjoy reliable, 24/7 electricity independent of sunlight or wind.
- Off-Grid Freedom: Generate your own power, eliminating monthly utility bills.
- Tailored Solutions: Design a system from 60W to 2kW, suitable for anything from basic lighting to multiple appliances.
- Key Factors: Understand how water flow (GPM) and vertical drop (head) determine your power potential.
- DIY Feasibility: Build an effective generator for an estimated $200–$500, with clear steps for construction and maintenance.
- Hybrid Advantage: Combine hydro with solar or wind for ultimate energy resilience.
Unlocking the Potential: Understanding Flow, Head, and Power
The heart of any successful water wheel generator lies in understanding your water source. It’s a simple equation: more water moving faster and falling further means more power. This isn’t just theoretical; it’s the fundamental principle guiding your design choices.
Flow Rate (Q): The Volume of Water
This is how much water passes a point over time, typically measured in gallons per minute (GPM) or liters per second (L/s). A minimum of 20 GPM is generally recommended for a viable system. To measure this, you can construct a simple weir (a small barrier across the stream) and time how long it takes for a 5-gallon bucket to fill downstream. For example, if it takes 15 seconds to fill a 5-gallon bucket, your flow rate is 20 GPM.
Head (H): The Vertical Drop
Head refers to the vertical distance the water falls before hitting the wheel. Even a modest 3-foot drop can be enough to start generating useful power. The greater the head, the more pressure and speed the water gains, directly translating to more rotational force on your wheel.
Calculating Your Power Output
While complex formulas exist, a straightforward way to estimate potential power (in Watts) is:
Power (Watts) = Flow rate (Liters/second) × Head (meters) × 9.81 × Efficiency
Efficiency typically ranges from 50% to 80% for DIY systems. So, if your stream provides 15 L/s flow with a 2-meter head, and your system is 65% efficient, you could generate around:
15 L/s × 2 m × 9.81 × 0.65 ≈ 191 Watts
This 191 Watts, running continuously, could produce about 4.5 kWh per day, which is ample for lights, phone charging, and running small appliances in an off-grid setup. For a deeper dive into the fundamental principles of harnessing this abundant energy, you might find our main guide invaluable: Water wheel free off-grid power.
Essential Components of Your Micro-Hydro System
Building a reliable water wheel generator involves more than just a spinning wheel. Each component plays a crucial role in converting water’s energy into stable, usable electricity.
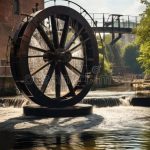
- Water Wheel / Rotor: This is the visible workhorse, designed to efficiently capture the water’s kinetic or potential energy. Its size, material (often wood or repurposed plastic), and paddle design are critical for optimal performance.
- Shaft / Axle: A robust shaft connects the water wheel to the generator, transferring the rotational force.
- Generator / Alternator: This is where the magic happens. A repurposed car alternator or a permanent magnet motor (PMDC motor) can effectively act as a generator, converting mechanical motion into electrical current.
- Rectifier & Charge Controller: Essential for regulating the generated electricity. The rectifier converts the generator’s AC output (if using an alternator) to DC, and the charge controller then ensures a steady, safe charge to your batteries, preventing overcharging and system damage.
- Battery Bank (Optional but Recommended): Deep-cycle batteries store excess power, ensuring electricity is available even if water flow fluctuates or when demand is higher than immediate generation.
- Supporting Structure: A sturdy frame (treated wood, galvanized steel, or concrete) holds the wheel and generator securely in place, often with adjustable mounts for fine-tuning.
- Electrical Components: This includes appropriate copper wiring (12-16 gauge), fuses, breakers, and an inverter if you plan to power standard AC household appliances. A multimeter helps with testing and calibration.
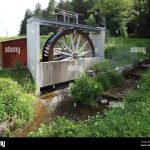
Choosing Your Water Wheel Design: Overshot, Breastshot, or Undershot?
The type of water wheel you build largely depends on your specific water source’s characteristics – primarily its head and flow. Each design has its advantages and ideal applications.
- Overshot Wheel:
- How it works: Water is channeled from above and spills into buckets or paddles on top of the wheel. The weight of the water, rather than just its force, drives the wheel downwards.
- Best for: Hilly or sloped terrains with a significant vertical drop (high head) and relatively lower flow rates.
- Efficiency: Generally the most efficient type (up to 80-90% in commercial designs, 70% for DIY), maximizing the potential energy of the falling water.
- DIY Tip: Aim for the largest practical diameter to increase torque and allow for slower, more powerful rotation.
- Breastshot Wheel:
- How it works: Water hits the wheel near its center, flowing into paddles or buckets at mid-level. It utilizes a combination of the water’s impulse and its weight.
- Best for: Medium-flow streams with moderate head.
- Efficiency: Good balance of speed and power, with efficiency often in the 50-70% range for DIY setups.
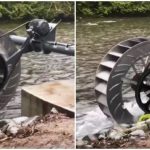
- Undershot Wheel:
- How it works: Water flows directly beneath the wheel, pushing against paddles immersed in the stream. It primarily relies on the kinetic energy (speed) of the water.
- Best for: Flat, steady streams or rivers with high flow but very low head.
- Efficiency: Easiest to build, but typically the least efficient (20-40% for DIY), as it only captures a fraction of the water’s energy.
- DIY Tip: Ensure paddles are well-designed to maximize surface area and minimize turbulence.
For most DIY home energy generation, an overshot wheel often presents the best balance of efficiency and buildability, assuming a suitable head is available.
Your Practical Playbook: Building a Water Wheel Generator Step-by-Step
Ready to get your hands dirty? Here’s a detailed guide to constructing your own water wheel electricity generator.
1. Site Selection & Flow Measurement: Laying the Foundation
- Scout Your Location: Identify a section of a stream or creek on your property with a consistent, year-round flow and a noticeable vertical drop. Consider accessibility for construction and maintenance, and crucially, ensure you have the legal right to use the water.
- Assess Environmental Impact: Before digging, consider how your installation might affect local wildlife, especially fish migration, and downstream water availability. Opt for run-of-the-river designs that don’t impound large amounts of water.
- Measure Flow Rate & Head: This is non-negotiable. Use the weir-and-bucket method for flow and a simple level or transit for head measurement. Record these figures accurately; they’ll dictate your system’s potential and design.
- Mini-example: You find a 4-foot drop over a 20-foot stretch of creek. By building a small temporary diversion, you time a 5-gallon bucket filling in 12 seconds, indicating a flow rate of 25 GPM. This is excellent starting data!
2. Constructing the Water Wheel: The Core Mechanism
- Material Selection: Durable, waterproof materials are key. Treated lumber, marine plywood, or repurposed plastic barrels are common choices. Consider coating wood with sealant or epoxy for longevity.
- Design & Diameter: For an overshot wheel, aim for the largest practical diameter to maximize torque. Cut 8-12 paddles or buckets, ensuring they are evenly sized and spaced around the rim for balanced rotation.
- Mounting the Axle: Securely mount the wheel onto a robust axle (e.g., a galvanized steel pipe or solid shaft). Ensure the axle runs smoothly and is well-balanced.
- Case Snippet: John used a large, discarded plastic barrel, cut into segments for paddles, and mounted them onto bicycle wheel rims, which were then reinforced and attached to a solid steel rod for the axle. This repurposing significantly cut down on material costs.
3. Mounting the Wheel & Directing Water: Precision Placement
- Sturdy Support Structure: Build a robust frame from treated wood or steel to support the water wheel. This structure must withstand continuous water force and the weight of the wheel. Ensure adjustable mounts if possible, allowing for fine-tuning.
- Channeling the Water: Construct a sluice box or use large-diameter PVC piping (as large as possible to minimize friction and maximize flow) to direct water precisely onto the wheel.
- Debris Management: Install a durable protective screen or mesh filter at the inlet of your sluice or pipe to prevent leaves, twigs, and sediment from reaching and damaging the wheel or generator. Regular cleaning of this screen is crucial.
4. Connecting the Generator/Alternator: Bridging Mechanical to Electrical
- Generator Choice: A 12V car alternator or a permanent magnet DC motor (which can function as a generator when spun) are popular DIY choices. These are relatively inexpensive and readily available.
- Mounting & Connection: Mount the chosen generator securely beside the water wheel. Connect the generator’s shaft to the water wheel’s axle using a belt drive or a gear system.
- Gearing for Efficiency: Generators typically require higher RPMs than a water wheel naturally produces. A gearbox or belt system with different-sized pulleys is often necessary to step up the water wheel’s rotation (e.g., a 100 RPM wheel geared to drive an alternator at 500-1,000 RPM). This maximizes the generator’s output. Adjust belt tension for optimal performance and minimal slippage.
5. Wiring the Electrical System: From Current to Usable Power
- Generator to Rectifier: If using a car alternator (which produces AC), connect its terminals to a rectifier. This converts the AC into DC, suitable for battery charging. Many permanent magnet motors output DC directly.
- Rectifier to Charge Controller: From the rectifier (or directly from a DC generator), run the output wires to a charge controller. This device regulates the voltage and current flowing into your battery bank, protecting batteries from overcharging and discharging too deeply.
- Charge Controller to Battery Bank: Connect the charge controller to your deep-cycle battery bank.
- Battery to Inverter (for AC): If you plan to power standard household appliances (which typically run on AC), connect an inverter to your battery bank. The inverter converts the DC power from the batteries into AC power.
- Safety First: Use appropriate gauge copper wiring (12-14 gauge for most home systems), waterproof junction boxes for all outdoor electrical connections, and install fuses and circuit breakers to protect your system from electrical surges or shorts.
- Basic Flow: Water Wheel → Generator → Rectifier → Charge Controller → Battery Bank → Inverter → AC Output (or DC output for specific appliances).
6. Testing, Calibration, and Ongoing Maintenance: Optimizing Performance
- Initial Test Run: With all connections secure, carefully divert water to the wheel. Observe the wheel’s speed, listen for any unusual noises, and use a multimeter to check the generator’s output voltage and current.
- Calibration: You may need to adjust the water flow, the angle at which water hits the wheel, or the belt tension to achieve optimal RPM for your generator and maximize power output.
- Regular Maintenance:
- Cleanliness: Regularly clear debris from the inlet screen, sluice box, and around the wheel.
- Lubrication: Keep bearings lubricated as per manufacturer recommendations.
- Inspection: Periodically check all moving parts for wear and tear, and inspect electrical connections for corrosion or damage. Ensure all waterproofing remains intact.
Prioritizing Safety and Environmental Responsibility
Building a water wheel generator involves working with water, moving parts, and electricity. Safety must be paramount.
- Personal Safety: Always wear protective gloves and safety goggles during construction and maintenance. Be acutely aware of slippery surfaces around water and potential sudden changes in water levels.
- Electrical Safety: Ensure all electrical connections are properly insulated and waterproofed, especially outdoors. Never work on the electrical system without first disconnecting it from the power source (generator and battery bank). Install appropriate fuses and circuit breakers.
- Environmental Considerations:
- Habitat Protection: Design your system to minimize impact on fish migration and aquatic ecosystems. Consider fish-friendly intake designs.
- Material Choice: Whenever possible, use natural, untreated construction materials or inert plastics to avoid chemical leaching into the water.
- Water Rights: Always verify local regulations and obtain any necessary permits before altering a natural watercourse.
Troubleshooting Common DIY Water Wheel Mistakes
Even the best-laid plans can hit snags. Here’s how to address typical issues encountered when building a water wheel generator:
- Poor Water Flow Alignment:
- Problem: Water isn’t hitting the wheel effectively, or it’s splashing excessively, reducing power.
- Solution: Reposition the sluice box or pipe to ensure a smooth, direct flow onto the wheel’s paddles. Check for leaks in the channeling system.
- Incorrect Generator Connection or Gearing:
- Problem: The generator isn’t spinning fast enough, or there’s excessive friction/noise.
- Solution: Use a belt tensioner to achieve the correct tension. Ensure shafts are precisely aligned. Re-evaluate your gearing ratio – you likely need a higher step-up ratio to get your generator to its optimal RPM range. Lubricate bearings.
- No Charge Controller / Battery Regulation:
- Problem: Batteries are overcharging, leading to damage, or the system isn’t delivering consistent power.
- Solution: Always include a rectifier (if needed) and a charge controller. These are critical for managing power flow to your battery bank and preventing costly damage.
- Weak Structural Support:
- Problem: The wheel or generator wobbles, leading to inefficiency and potential failure.
- Solution: Reinforce the frame with additional treated lumber, galvanized steel brackets, or concrete. Ensure the ground foundation is stable and level.
- Ignoring Debris and Sediment:
- Problem: Leaves, twigs, or silt clog the system, reducing flow and potentially damaging components.
- Solution: Install a robust metal mesh filter at the water inlet and commit to regularly cleaning it, especially after storms or during leaf-fall seasons.
- Underestimating Power Storage Needs:
- Problem: You run out of power quickly, especially during periods of high demand or low flow.
- Solution: Accurately estimate your daily power consumption and size your battery bank accordingly. A good rule of thumb is to have enough capacity to store 1.5 times your average daily generation.
Integrating with Other Renewables: The Hybrid Advantage
While a water wheel provides exceptional continuous power, combining it with other renewable sources creates an even more resilient and efficient off-grid system.
- Water as Base Power: Your water wheel generator can serve as your “base load” provider, offering reliable 24/7 power, especially valuable at night or on cloudy/windless days.
- Solar for Daytime Peaks: Solar panels can supplement your hydro during daylight hours, covering peak demand and reducing the load on your water wheel, potentially extending the lifespan of mechanical components.
- Wind for Variability: A small wind turbine can contribute during stormy weather or seasons when water flow might be lower, adding another layer of generation diversity.
A hybrid system offers the best of all worlds: continuous generation from hydro, daytime boosts from solar, and intermittent power from wind, ensuring extended battery lifespan, higher overall efficiency, and true energy independence. Imagine your water wheel quietly humming at night, while solar panels soak up the sun during the day, all feeding a common battery bank.
Your Path to Off-Grid Power
Learning how to make a water wheel that generates electricity is a journey into self-reliance and sustainable living. From a small setup providing 60-100W for basic lighting to an advanced hybrid system producing 1-2 kW, the possibilities are substantial. The economic benefits are clear – no more utility bills, minimal ongoing costs, and the satisfaction of knowing your power comes directly from nature’s reliable rhythm.
Start by meticulously assessing your water source. Measure flow, determine head, and choose the wheel type that best suits your location. Gather your materials, build with care, and embrace the ongoing maintenance that ensures longevity. This hands-on project not only delivers free electricity but also connects you more deeply to the energy that sustains your home and lifestyle.

- How to Make a Water Wheel that Generates Electricity at Home - April 5, 2026
- DIY Waterwheel Electricity Turns Streams Into Home Energy - April 4, 2026
- How Does a Water Wheel Make Electricity Through Mechanical Motion? - April 3, 2026