That steady stream running through your property is more than just a scenic feature—it’s a potential powerhouse. With the right micro hydro kit, you can transform the kinetic energy of moving water into clean, reliable electricity that feeds directly into your home’s grid. This isn’t a futuristic concept; it’s a practical, accessible way to reduce your carbon footprint and gain energy independence.
But turning that potential into power requires matching the right technology to your specific water source. It’s a puzzle of pressure, flow, and precision engineering.
Match the Kit to Your Stream: Understand the critical difference between low-head and high-head systems and identify which type you need.
Key Components Explained: Decode the parts of a grid-tied micro hydro kit, from the intake screen to the grid-tie inverter.
A Comparative Look at Top Models: See how popular kits from brands like PowerSpout, Natel Energy, and Toshiba stack up for different scenarios.
The Installation Reality: Get a clear-eyed view of the planning, permitting, and professional help required for a successful installation.
Maintenance Essentials: Learn the routine tasks that will keep your system generating power efficiently for years to come.
First, Assess Your Water Resource
Before you even browse for a micro hydro kit, you need to know your two most important numbers: head and flow. All your subsequent decisions hinge on these measurements. Getting them wrong is the most common and costly mistake a homeowner can make.
Head: This is the vertical distance the water falls. Think of it as water pressure. High head is like having a fire hose—powerful and concentrated. Low head is more like a wide, slow-moving river. It’s measured in feet or meters.
Flow: This is the volume of water moving through your system over a period of time, typically measured in gallons per minute (GPM) or cubic feet per second (CFS).
A site with high head and low flow requires a completely different type of turbine than a site with low head and high flow. This initial data collection is the absolute foundation of a successful project. To get a complete walkthrough on measuring these vital statistics and understanding the broader selection criteria, you should first Select your hydroelectric kit.
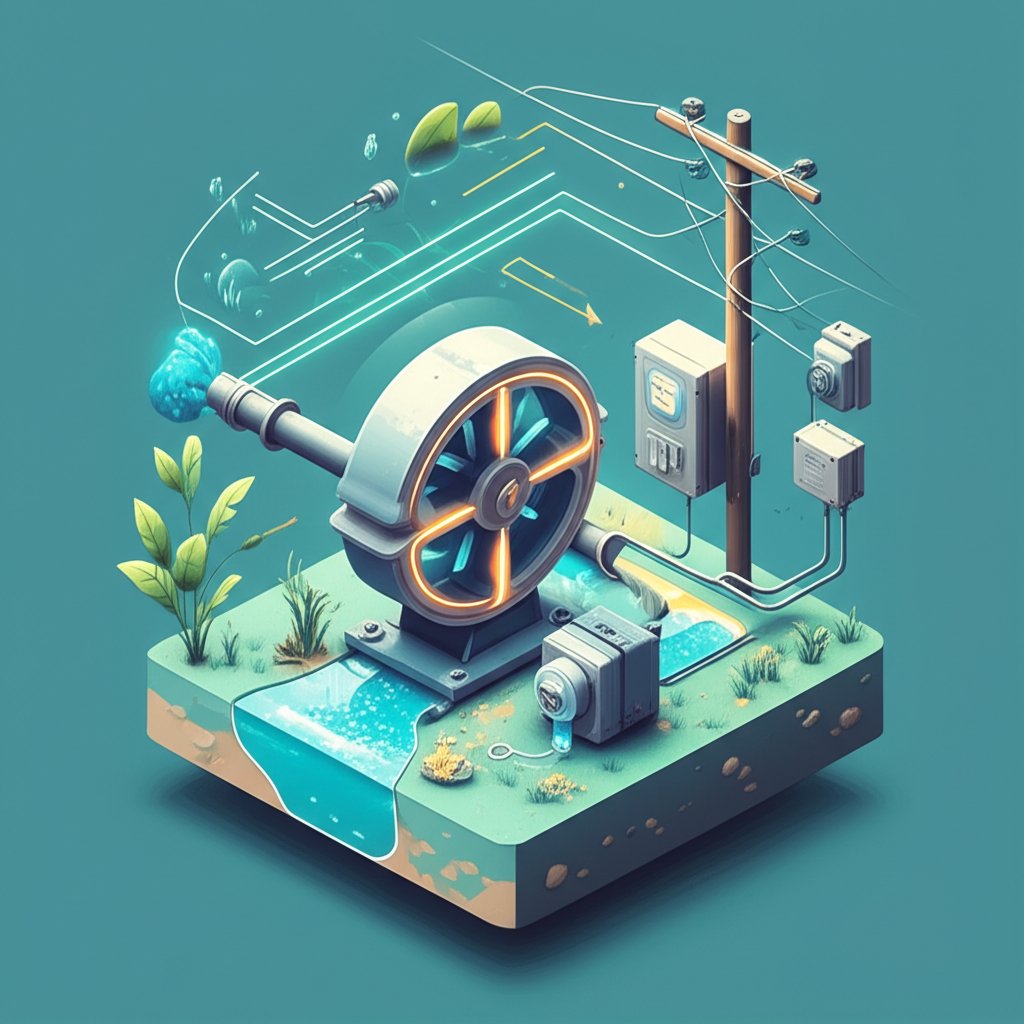
Anatomy of a Grid-Tied Micro Hydro Kit
While each micro hydro kit has unique features, they all share a core set of components that work in concert to deliver power to your home. Understanding their roles demystifies the entire system.
Intake Structure: This is where it all begins. A simple screened inlet diverts a portion of the stream’s water into your system while filtering out leaves, rocks, and other debris that could damage the turbine.
Penstock: This is the pipeline that carries the water from the intake down to the powerhouse. The penstock is crucial for building head (pressure). The steeper the drop, the more pressure builds.
Powerhouse: A small, protected enclosure that houses the heart of the system:
Turbine: The waterjet strikes the turbine’s blades or buckets, causing it to spin rapidly. Common types include Pelton, Turgo, and Crossflow, each designed for different head and flow conditions.
Generator: The spinning turbine is connected to a generator (often a Permanent Magnet Generator for higher efficiency), which converts the mechanical rotation into electrical energy.
Control System & Inverter: This is the “brain” of a grid-tied setup.
Load Controller: Protects the system by ensuring a consistent load on the generator, preventing it from over-speeding.
Grid-Tie Inverter: This is the magic box. It converts the DC electricity from the generator into AC electricity that matches the frequency and voltage of your home’s utility grid. It allows you to use the power you generate and send any excess back to the utility, potentially spinning your meter backward.
Choosing Your Turbine: A Tale of Two Water Sources
The turbine is the single most important component to match to your site. Manufacturers have engineered specific designs to excel in different environments. Let’s break them down into the two main categories: low-head and high-head systems.
Low-Head Powerhouses: For Gentle Slopes and Higher Flow
If your property has a gentle grade with a vertical drop of less than 50 feet (and often as low as 3-10 feet), you’re in low-head territory. These systems are designed to handle larger volumes of water moving at lower pressure. Case Snippet: Imagine a homeowner with a wide, consistently flowing creek that drops only 8 feet across their property. They need a turbine that can capture energy from this high-volume, low-pressure flow.
Here are some leading low-head options:
Model
Ideal Head
Max Power
Key Features
PowerSpout LH
Starts at 3.3 ft (1m)
1,600 W
Modular (use multiple units), fish-friendly slow runner, made with recycled materials.
Natel Energy Restoration Hydro
Starts at 6.5 ft (2m)
Varies
Innovative fish-safe design with thick, blunt blades; high efficiency (80-90%).
Toshiba Hydro-eKIDS
Low-head optimized
Up to 10 kW
All-in-one modular system with fish-friendly turbine and integrated grid-tie inverter.
The PowerSpout LH Low Head Turbine is a standout for its modularity. If your power needs grow, you can add another unit. Its design is also recognized for being “fish-friendly,” with a large, slow-moving runner that allows aquatic life to pass through more safely.
Similarly, Natel Energy’s Restoration Hydro Turbine was engineered from the ground up for ecological safety. Its unique thick, blunt blades and slower rotation speed make it exceptionally safe for fish passage, a critical consideration for environmentally sensitive waterways.
High-Head Specialists: Tapping into Pressure and Speed
If your land is steep and you can create a vertical drop of 50 feet or more (up to 600 feet), you have a high-head site. These systems can generate significant power from a surprisingly small amount of water flow because of the immense pressure created. Case Snippet: A landowner has a small spring-fed stream at the top of a hill that drops 150 feet before it reaches their home. Even with a flow of just 15 GPM, the high pressure can spin a specialized turbine very fast.
These kits often use impulse turbines like the Pelton or Turgo wheel:
Model
Ideal Head
Max Power
Key Features
Energy Systems & Design Stream Engine
50 to 600 ft
4,000 W
Excels in very low flow (from 2 GPM); built-in electronic load controller.
Scott Hydroelectric Turbine
5 to 50 ft
Up to 5 kW
Uses an efficient Pelton wheel design, effective in lower-flow, higher-head scenarios.
Harris Hydroelectric PMG
Varies
Varies
Uses a Permanent Magnet Generator (PMG) for high efficiency, even at lower flow rates.
The Energy Systems & Design Stream Engine is a marvel for high-head, low-flow sites. Its ability to start generating useful power with as little as 2 GPM makes it an option for properties with very modest water sources, as long as they have significant elevation drop.
The Scott Hydroelectric Turbine relies on the classic and highly efficient Pelton wheel. This design uses a focused jet of high-pressure water to strike “buckets” on the wheel, making it incredibly effective at converting water pressure into rotational speed.
From Box to Grid: Your Installation Roadmap
Purchasing a micro hydro kit is just the first step. Installation is a significant project that requires careful planning and, in most cases, professional expertise.
Step 1: Permitting and Professional Consultation
Before you dig, talk to your local authorities about water rights and building permits. Grid-tied systems also require coordination with your utility company. Consulting with a micro hydro installation specialist is highly recommended to ensure your design is safe, efficient, and compliant.
Step 2: Site Preparation and Intake Construction
This involves building a small, stable diversion at your intake point and clearing a path for the penstock pipeline. The work must be done carefully to minimize environmental impact.
Step 3: Running the Penstock and Assembling the Powerhouse
The penstock pipe is laid and secured, running from the intake to the powerhouse location. The powerhouse itself can be a small, shed-like structure you build to protect the turbine, generator, and electronics from the elements.
Step 4: The Final Connection (Turbine, Generator, and Grid)
Inside the powerhouse, the turbine and generator are mounted and connected to the penstock. The final, and most critical, step for a grid-tied system is the electrical work. A licensed electrician must connect the system’s inverter to your home’s main electrical panel. This is not a DIY task.
A Note on Maintenance: A micro hydro system isn’t “set it and forget it,” but the upkeep is manageable. Expect to perform routine checks:
Weekly: Clear leaves and debris from the intake screen.
Monthly: Walk the penstock line to check for any leaks.
Annually: Inspect the turbine runner for wear and have a professional check the electrical connections and bearings.
Quick Answers to Common Questions
Is a micro hydro kit noisy?
The sound is often described as a steady “white noise” or hum, similar to a running dishwasher. The powerhouse enclosure dampens much of the sound. The main source of noise is the water jet hitting the turbine, not the generator itself.
What does “fish-friendly” actually mean?
It refers to turbine designs that minimize harm to fish and other aquatic life. This is typically achieved with features like:
Slower rotational speeds.
Fewer, larger blades.
Thick, blunt blade edges instead of sharp ones.
The absence of tight gaps where fish could be pinched.
Models from Natel Energy and PowerSpout are specifically engineered with these principles in mind.
Can I go completely off-grid with these kits?
Yes, but it requires a different system architecture. An off-grid micro hydro kit needs a battery bank to store energy and a charge controller to manage the batteries, in addition to an off-grid inverter. Grid-tied systems are simpler because the utility grid acts as your “battery.”
How much does a complete micro hydro kit installation cost?
This varies widely based on the kit itself, the length of the penstock needed, and the cost of labor. A small DIY-heavy system might cost a few thousand dollars, while a professionally installed, high-output system like the Toshiba Hydro-eKIDS could be a much larger investment. The key is to calculate the long-term payback from your energy savings.
Your Next Move: From Research to Renewable Power
Choosing the right micro hydro kit is an exercise in matching technology to terrain. Your path forward depends entirely on the unique characteristics of your property’s water source.
Start by making a simple determination:
If you have a vertical drop of less than 50 feet: Your research should focus on low-head systems. Look into the modularity of the PowerSpout LH, the ecological design of the Natel turbine, or the integrated approach of the Toshiba Hydro-eKIDS.
If you have a vertical drop of more than 50 feet: You are a candidate for a high-head system. Explore how the Stream Engine can work with very low flows or how a Pelton-wheel system like Scott’s can maximize energy from high-pressure water.
Once you know your head and flow, you can move from general interest to a specific, actionable plan. With careful planning and the right equipment, that stream on your land can become a lasting source of clean, renewable power for your home.
I am a writer who loves renewable energy, with a focus on sustainable living, renewable energy, and eco-friendly innovation. With a passion for environmental awareness and a desire to explore the latest trends in green technology, corporate sustainability, and climate action. Through in-depth storytelling