Did you know that working smoke alarms can cut your risk of dying in a home fire by almost half? This statistic highlights how crucial proper smoke detector placement is for your family’s safety. This guide provides clear, visual instructions—like blueprints, but much easier to understand—to help you optimize your smoke detector setup.
Before discussing placement, let’s quickly review the different types of smoke detectors:
Detector Type
Best For
How It Works
Ionization
Fast-flaming fires
Senses changes in electrical current caused by smoke
Photoelectric
Smoldering fires
Senses light blocked or scattered by smoke
Dual-Sensor
Both types of fires
Combines both ionization and photoelectric sensors
Ionization detectors are quick to detect fast-flaming fires (e.g., grease fires), while photoelectric detectors are better at detecting smoldering fires (e.g., upholstery fires). Dual-sensor detectors offer the best of both worlds. Some experts suggest that the ideal setup might include a combination of detector types for comprehensive coverage, but this isn’t always necessary. Ongoing research continues to explore the effectiveness of different detector types in various scenarios.
Visual Placement Guides
(Note: These diagrams illustrate general guidelines. Always consult NFPA 72 and your local building codes for specific requirements, which may supersede these recommendations.)
The following diagrams offer visual guidance for different home layouts. While these diagrams are representative, your specific home may require adjustments based on its unique features.
(Insert Diagram: Single-Story Home with labeled smoke alarm locations, color-coded by alarm type. Key areas like bedrooms, hallways, and living areas clearly marked)
Single-Story Homes: Place detectors inside each bedroom, outside sleeping areas (hallways), and in the living area.
(Insert Diagram: Two-Story Home with labeled locations and color-coding)
Two-Story Homes: Follow the same guidelines as single-story homes for each level. Crucially, add detectors at the top and bottom of stairways, as these act as channels for smoke.
(Insert Diagram: Split-Level Home with clear labels and color-coding)
Split-Level Homes: Treat each “half-level” as its own story for detector placement. This ensures comprehensive coverage in these unique layouts.
(Insert Diagram: Basement with labeled locations and color-coding.)
Basements: Include a detector near the basement stairs, even if the basement is unfinished.
(Insert Diagram: Home with Vaulted Ceilings highlighting specific mounting instructions related to peak placement and distance requirements.)
Vaulted/Sloped Ceilings: Place detectors within three feet of the peak, measured horizontally. For sloped ceilings, the placement should be within three feet of the highest point. In larger rooms with high ceilings, multiple detectors may be beneficial.
Placement Considerations
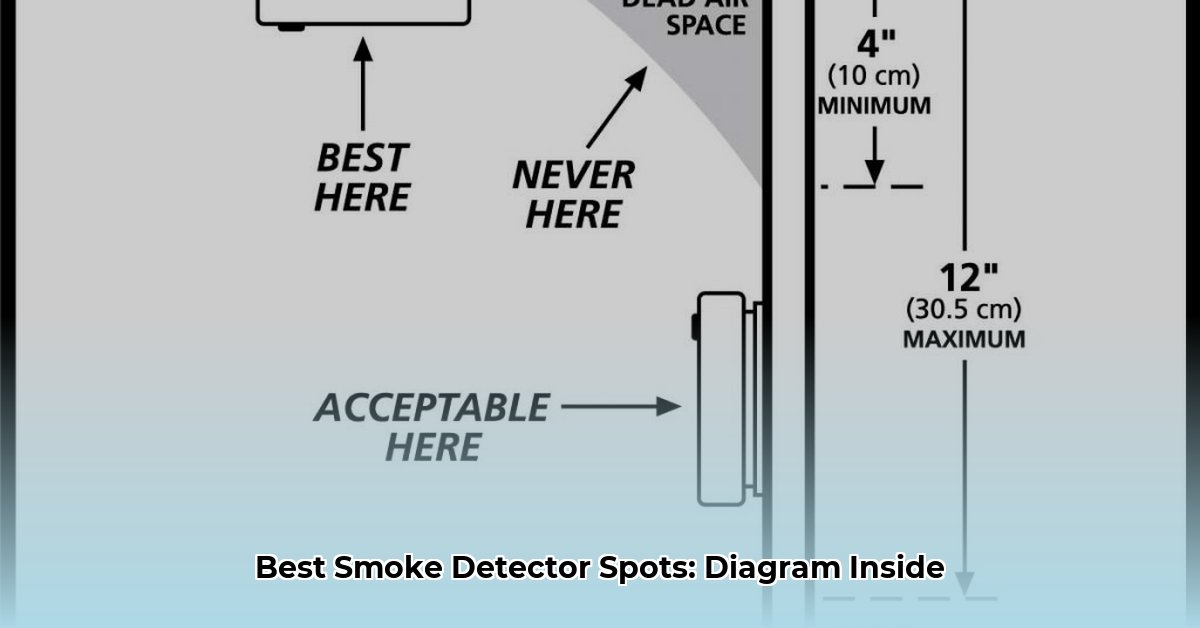
Distance from Walls/Corners: Maintain a 4-inch minimum distance from walls and corners for proper airflow.
Avoid Obstructions: Keep detectors away from air vents, ceiling fans, and drafts.
Dead Air Spaces: Avoid corners where “dead air” can accumulate and hinder smoke detection.
Kitchens and Bathrooms: Avoid placing detectors directly inside kitchens and bathrooms due to potential false alarms from steam and cooking fumes. Place them just outside these areas.
Installation and Maintenance
Installation
Hardwired vs. Battery-Powered: Choose hardwired interconnected alarms for maximum protection, especially if your local code requires it. Battery-powered alarms are a suitable alternative, but remember to use interconnected models.
Manufacturer’s Instructions: Always follow the manufacturer’s instructions for installation.
Testing After Installation: Test each alarm after installation to ensure proper function.
Maintenance
Regular Testing: Test alarms monthly.
Battery Replacement: Replace batteries annually or when the alarm chirps.
Cleaning: Clean detectors every six months with a vacuum cleaner brush attachment or compressed air.
Replacement: Replace smoke alarms every 10 years, regardless of their apparent functionality.
Advanced Options
Interconnected Alarms: Highly recommended. If one alarm sounds, all interconnected alarms will sound, increasing the chances of everyone being alerted.
Smart Detectors: Offer features like smartphone notifications, remote silencing, and integration with other smart home devices.
Local Codes and Regulations
Always consult your local building codes and fire department for specific requirements. NFPA 72 (National Fire Alarm and Signaling Code) provides comprehensive guidelines, but local codes may have additional stipulations.
Conclusion
By following this guide, you can significantly enhance your home’s fire safety. Proper smoke detector placement, combined with regular maintenance and appropriate detector selection, provides crucial early warning in case of a fire. While this guide provides helpful advice, staying informed about advancements in fire safety technology and consulting with your local fire department is always recommended.
I am a writer who loves renewable energy, with a focus on sustainable living, renewable energy, and eco-friendly innovation. With a passion for environmental awareness and a desire to explore the latest trends in green technology, corporate sustainability, and climate action. Through in-depth storytelling


")