Imagine a continuous, silent hum of power, generated right in your backyard from the stream you walk by every day. That’s the promise of waterwheel electricity, transforming a simple flow of water into a consistent, free source of energy for your home. Far from being a relic of the past, modern DIY waterwheel generators offer a robust, eco-friendly path to genuine off-grid independence, making sustainable living more accessible than ever. If you have a reliable water source, you hold the key to unlocking consistent power, day and night, rain or shine.
Continuous Energy: Generate electricity 24/7, unlike solar or wind.
Diverse Designs: Choose the right waterwheel type for your specific stream conditions (head height, flow rate).
DIY Feasibility: Learn the core components and steps to build your own system, often repurposing common materials.
Practical Output: Understand what a typical DIY setup can power, from basic cabin needs to more extensive home requirements.
Pitfall Prevention: Identify common mistakes and how to avoid them for a successful, long-lasting system.
Integration Potential: Discover how waterwheel generators fit into a larger, resilient hybrid energy strategy.
Understanding the Heart of the Flow: How Waterwheel Electricity Works
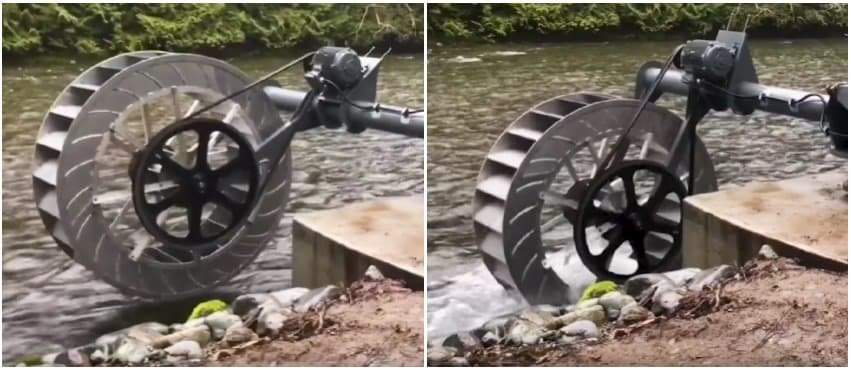
At its core, a waterwheel power generator is a marvel of kinetic energy conversion. Flowing water, whether from a swift stream or a gentle cascade, possesses energy. A waterwheel is designed to capture this energy, rotating as the water pushes against its paddles or buckets. This rotational motion is then transferred via a shaft to an electrical generator – essentially an alternator or dynamo – which performs the magic of converting mechanical movement into usable electrical power. Think of it as a river-powered bicycle powering a light bulb, but on a much more robust scale.
The efficiency of this conversion depends heavily on the water itself. Both the flow rate (how much water passes per second) and the head (the vertical drop or height the water falls) are critical. More water moving faster, or falling from a greater height, means more power potential. A basic formula for estimating this potential is: Power (Watts) = Flow Rate (Liters/Second) × Head (Meters) × 9.81 × Efficiency. DIY systems can often achieve a respectable 50–80% efficiency, turning a significant portion of the water’s natural energy into usable watts. To dive deeper into the broader context of creating your own energy, consider exploring the comprehensive guide on Water Wheel Off-Grid Power.
Choosing Your Flow: Matching Waterwheel Designs to Your Site
Not all streams are created equal, and neither are all waterwheels. Selecting the right type is the first critical decision in designing an efficient waterwheel electricity system. Each design has unique advantages, best suited for specific hydrological conditions.
Undershot Wheels: Harnessing Velocity
These are perhaps the simplest to construct. Undershot wheels rely primarily on the velocity of the water. The stream flows directly beneath the wheel, pushing against paddles submerged in the current.
Best For: Fast-flowing, relatively shallow streams with minimal vertical drop (low head).
Advantages: Simple design, easier to build and maintain, requires less civil engineering.
Drawbacks: Less efficient (typically 20-30%) compared to other types, as they capture less of the water’s potential energy.
Real-World Fit: Imagine a wide, fast-moving river where diverting water for a significant drop isn’t practical.
Considered the most efficient design, overshot wheels utilize the gravitational potential energy of water falling from above. Water is channeled to the top of the wheel and fills buckets or compartments, causing the wheel to rotate primarily by the weight of the water.
Best For: Streams with a significant vertical drop (high head), often found in hilly or mountainous terrain.
Advantages: Up to 70% efficient, maximizing power output from a given water flow.
Drawbacks: Requires a more complex system to channel water to the top (e.g., a long sluice or pipe), demanding more site modification and structural support.
Real-World Fit: A mountain stream that can be easily diverted to fall a few meters onto the wheel.
Breastshot Wheels: Balancing Speed and Drop
Breastshot wheels strike a balance between undershot and overshot designs. Water is channeled to impact the wheel at or slightly below its mid-level, leveraging both the water’s velocity and a moderate amount of gravitational potential.
Best For: Moderate head heights and decent flow rates where a full overshot isn’t feasible, but more efficiency than an undershot is desired.
Advantages: Good efficiency (around 50-60%), combining benefits of both velocity and weight.
Drawbacks: Requires careful channeling and wheel construction to optimize water impact.
Real-World Fit: A medium-sized creek with a gentle slope, where you can create a small weir to raise the water level slightly before it hits the wheel.
Pitchback Wheels: Enhanced Efficiency for Moderate Sites
A close cousin to the overshot, the pitchback wheel also receives water near the top, but the water hits slightly behind the wheel’s apex. This design can enhance efficiency and reduce structural strain by creating a smoother rotation and often allowing for a slightly smaller head than a true overshot.
Best For: Similar to breastshot, suitable for medium head and moderate flow, aiming for enhanced overshot-like efficiency without the extreme head requirements.
Advantages: High efficiency, good for sites where water delivery is slightly complex, offers a smoother operation.
Drawbacks: Slightly more complex channeling than a breastshot.
Real-World Fit: A site where you have a good vertical drop but perhaps not enough to justify the full height of a classic overshot, or where smoother operation is a priority.
Your DIY Toolkit: Essential Components for a Home Hydro System
Building your own waterwheel electricity generator is a rewarding project, but it requires the right blend of mechanical and electrical components. Here’s what you’ll need, with practical notes for DIYers:
Water Wheel/Rotor: This is your primary energy collector.
DIY Tip: You can craft this from treated wood, repurposed metal drums, or even heavy-duty recycled plastic. Ensure paddles or buckets are robust and evenly spaced. Consider coating with marine sealant for longevity.
Shaft/Axle: The backbone that transfers the wheel’s rotation.
DIY Tip: A strong steel shaft (e.g., from an old industrial motor or vehicle axle) is ideal. Treated hardwood can work for smaller, lower-power systems but requires meticulous waterproofing and protection.
Bearings: Crucial for smooth, low-friction rotation.
DIY Tip: Sealed ball bearings are best as they resist water ingress and require less maintenance. Ensure they are correctly sized for your shaft and regularly lubricated.
Generator/Alternator: The electrical heart of the system.
DIY Tip: A used car alternator (e.g., from a truck for higher output) is a common, cost-effective choice for DIYers. For higher efficiency and lower RPM generation, a permanent magnet generator (PMG) specifically designed for hydro or wind applications is superior, though more expensive.
Rectifier & Charge Controller: Essential for power regulation.
Rectifier: Converts the AC (alternating current) output of most alternators/generators into DC (direct current) suitable for batteries.
Charge Controller: Protects your battery bank from overcharging and manages the power flow, ensuring stable voltage. Never skip this component.
Battery Bank (Optional but Recommended): Stores excess power for use when generation is low or demand is high.
DIY Tip: Deep-cycle marine or RV batteries are excellent for this purpose, designed for repeated deep discharges. Size your bank to hold at least 1.5 times your estimated daily power usage.
Inverter (for AC Appliances): Converts DC battery power back to standard AC power for most household appliances.
DIY Tip: Choose a pure sine wave inverter for sensitive electronics, sized to handle your peak AC load.
Support Structure: The foundation of your system.
DIY Tip: Treated lumber, heavy-gauge steel, or concrete blocks provide robust support. Ensure it’s anchored securely to resist water forces and potential flooding.
Wiring & Electrical Safety: Connects all components and protects your system.
DIY Tip: Use appropriate gauge copper wiring (12-16 gauge typically for DC output from generator to controller/battery). Incorporate safety fuses and breakers at critical points (e.g., between generator and controller, and between battery and inverter) and use waterproof junction boxes for all outdoor connections.
Sluice Box/Water Channel: Directs water to the wheel.
DIY Tip: Can be constructed from lumber, PVC pipe, or even a section of culvert pipe. Include a mesh screen at the inlet to prevent debris from reaching the wheel.
From Concept to Current: Building Your Waterwheel Generator, Step-by-Step
Building a waterwheel electricity system isn’t just about assembling parts; it’s about thoughtful design, careful construction, and diligent maintenance. Here’s a practical guide to get you started:
1. Location Scouting and Permitting Checks
Your success hinges on the right location. Look for a water source with:
Consistent Flow: Year-round reliability is key. A stream that dries up in summer won’t cut it.
Decent Head: Even a small vertical drop (1 meter or more) can be leveraged, especially with an overshot or breastshot wheel.
Accessibility: You’ll need to transport materials, build, and maintain the system.
Legal Clarity:Crucially, research local water rights and environmental regulations. Diverting or altering a waterway may require permits. Check with your local environmental agency or county office before you start.
2. Crafting Your Wheel: The Power Collector
Whether you opt for undershot, overshot, or breastshot, the wheel itself is fundamental.
Materials: Durable, waterproof materials are paramount. Treated lumber (e.g., marine-grade plywood), galvanized steel, or even heavy-duty recycled plastic barrels (cut and shaped into paddles) can work.
Design: For an undershot, 8–12 flat paddles are common. For overshot/breastshot, focus on creating deep, efficient buckets. Ensure paddles/buckets are evenly spaced and securely fastened to the rim and spokes.
Axle Integration: The wheel needs to be perfectly centered and rigidly attached to the shaft/axle. Any wobble will lead to premature wear and reduced efficiency.
3. Mounting the Wheel and Directing Water Flow
Once built, the wheel needs proper placement to interact with the water effectively.
Support Structure: Construct a robust frame using treated lumber, steel, or concrete. This frame must be strong enough to withstand the forces of flowing water and the weight of the wheel and generator. Anchor it securely to the streambed or banks.
Water Channeling: This is where your chosen wheel type dictates the approach.
Undershot: Position the wheel so the bottom paddles are immersed in the fastest part of the flow.
Overshot/Breastshot: Build a sluice box or use large-diameter PVC/HDPE pipe to divert water from upstream and deliver it precisely to the top or mid-level of the wheel.
Debris Management: Always install a robust mesh screen at the inlet of your sluice or pipe to prevent leaves, sticks, and sediment from reaching and damaging the wheel or generator. Clean it regularly.
4. Connecting the Generator: Turning Motion into Watts
This step links the mechanical power of the wheel to electrical generation.
Mounting: Securely mount your chosen generator (car alternator or PMG) to the support structure, typically beside the waterwheel.
Power Transmission: Connect the wheel’s shaft to the generator’s input shaft.
Belt Drive: A simple and common method. Use a sturdy belt and pulleys. Often, a larger pulley on the waterwheel and a smaller pulley on the generator are used to increase the RPMs to the generator, as alternators often require 500-1000 RPMs to produce sufficient voltage for battery charging. A 100 RPM waterwheel might need a 1:5 to 1:10 gear ratio to drive an alternator effectively.
Direct Drive: More efficient but requires precise alignment and a generator designed for low RPM operation (like some PMGs).
Flywheel (Optional): For inconsistent water flow or to stabilize generator RPMs, a flywheel can be added to the generator shaft. It smooths out rotational variations, leading to more consistent power output.
5. Wiring the Electrical System: From Generator to Home
Careful wiring is crucial for safety and functionality. Follow this typical flow:
Generator to Rectifier: If using a car alternator (which outputs AC or unregulated DC), connect its AC output terminals to a rectifier to convert it to stable DC voltage. If using a PMG that outputs AC, it will also need a rectifier.
Rectifier to Charge Controller: Run the DC output from the rectifier to your charge controller. This device regulates the voltage and current, preventing overcharging of your batteries.
Charge Controller to Battery Bank: Connect the charge controller’s output to your deep-cycle battery bank. This is where your generated power is stored.
Battery Bank to Inverter: If you need AC power for household appliances, connect the battery bank to an inverter.
Inverter to AC Output/Breaker Panel: The inverter’s output can then be wired to an AC breaker panel or directly to specific AC loads.
Safety First: Use appropriate gauge copper wire (e.g., 12-14 gauge for generator output, heavier for inverter to battery). Install fuses and circuit breakers at each stage (e.g., between generator and controller, and between battery bank and inverter) and use waterproof junction boxes for all outdoor connections. A multimeter is invaluable for testing voltages and current throughout the process.
6. Test, Calibrate, and Maintain: Keeping the Power Flowing
Your system isn’t “set it and forget it.”
Initial Test: With everything connected, allow water to flow. Observe the wheel’s rotation, generator output (using your multimeter), and battery charging.
Calibration: Adjust water flow (if possible), wheel angle, or belt tension to optimize power generation. Aim for the generator’s sweet spot for efficient charging.
Regular Maintenance:
Weekly: Clean the inlet screen of debris.
Monthly: Inspect bearings for wear, lubricate as needed, and check belt tension.
Quarterly: Inspect all electrical connections for corrosion or loosening. Check battery fluid levels (if applicable) and terminal cleanliness.
Annually: Inspect the waterwheel for structural integrity, paddle wear, and reapply sealant or paint as needed to prolong its life.
Real-World Power: What Can Your Waterwheel System Run?
The power output of a DIY waterwheel electricity generator varies widely, but even a modest system can significantly reduce reliance on grid power or fully power an off-grid setup.
Small System Example: A tiny stream with 10 liters per second (L/s) flow and a 1-meter vertical drop, using an efficient overshot wheel, might produce around 60–100 Watts continuously. This translates to roughly 1.4 – 2.4 kWh per day, enough for LED lighting, charging phones/laptops, and possibly a small DC fan or radio in a cabin.
Mid-Range System Example: A more substantial stream with 20 L/s flow and a 2-meter head could generate 200–300 Watts continuously (around 4.8 – 7.2 kWh per day). This opens up possibilities for powering a small refrigerator, a well pump (intermittently), multiple lights, and common electronics in a compact home or larger cabin.
Larger Systems: With more significant flow and head, systems generating 1–2 kW (or more) are achievable, capable of powering most standard household appliances, including a washing machine or even a small electric stove for short durations, especially when paired with a robust battery bank.
The key to maximizing utility is a well-sized battery bank, acting as a buffer. It stores excess power generated during periods of low demand and discharges it when demand is high, or when flow might temporarily diminish. Integrating with efficient DC appliances where possible can also reduce losses from DC-to-AC conversion via an inverter.
Avoiding the Current Shocks: Common Pitfalls and How to Sidestep Them
Even with careful planning, DIY waterwheel projects can hit snags. Knowing common pitfalls can save you time, money, and frustration.
Poor Water Flow Alignment: If water isn’t hitting the wheel effectively, power output plummets.
Fix: Meticulously position the wheel and optimize your sluice box or channeling. Use adjustable gates if possible to fine-tune water delivery.
Incorrect Generator Connection: Misaligned shafts, loose belts, or inappropriate gear ratios lead to inefficient power transfer or generator damage.
Fix: Ensure precise alignment of the wheel and generator shafts. Use a tensioning system for belt drives and lubricate bearings regularly. Check your generator’s required RPMs for optimal output and size pulleys accordingly.
No Charge Controller or Battery Regulation: Directly connecting a generator to batteries without regulation is a recipe for disaster, leading to overcharged, damaged, or even explosive batteries.
Fix:Always use a rectifier (if needed) and a properly sized charge controller. This is non-negotiable for battery health and safety.
Weak Structural Support: The forces of water are powerful. A flimsy structure will fail, especially during high flow events.
Fix: Over-engineer your frame. Use treated lumber or heavy steel. Add cross-braces, concrete footings, and anchor points to withstand dynamic loads.
Ignoring Debris and Sediment: Leaves, sticks, and grit can clog channels, damage wheels, and wear down components.
Fix: Install a robust, easily cleanable mesh filter or trash rack at your water inlet. Design it to be accessible for daily or weekly cleaning.
Underestimating Power Storage Needs: A small battery bank means you run out of power quickly when demand exceeds generation.
Fix: Accurately estimate your daily power consumption and size your battery bank to hold at least 1.5 times that amount, allowing for cloudy days (if integrated with solar) or periods of lower flow.
Lack of Long-Term Maintenance: Components wear out, especially in a wet, dynamic environment.
Fix: Establish a regular maintenance schedule. Inspect bearings monthly, clean debris weekly, grease moving parts, check electrical connections quarterly, and repaint/reseal the wheel annually to prevent rot or rust.
Hydro vs. Other Renewables: A Quick Comparison for Your Off-Grid Mix
When planning an off-grid energy solution, waterwheel electricity stands out, but it’s often strongest when integrated with other sources. Here’s how it compares:
Water Wheel Generators:
Pros: Provide continuous, 24/7 power, high energy efficiency (especially overshot), low noise, and relatively low maintenance once established. They are highly reliable day and night, regardless of sun or wind.
Cons: Location-dependent (requires consistent water flow and head), initial setup can be labor-intensive and require permits.
Solar Power (Photovoltaic):
Pros: Easy to install, modular, low maintenance, silent operation.
Cons: Produces no power at night or on heavily cloudy days. Requires significant battery storage to bridge power gaps and is sensitive to shading.
Wind Power:
Pros: Can work day and night, especially useful in windy locations.
Cons: Inconsistent and highly location-dependent, requiring strong, steady winds. Can be noisy, produce vibrations, and may have visual impact. Hybrid Energy Systems: For the ultimate in off-grid reliability, combining sources is often the best approach. A waterwheel generator provides a fantastic baseline of continuous power, acting as the “baseload” generator. Supplementing this with solar panels (for daytime peaks or summer months) or a small wind turbine (for periods of high wind) creates a truly resilient system, ensuring power availability no matter the weather fluctuations or time of day. For example, a waterwheel can keep batteries topped up consistently, while solar panels add a boost during peak daylight hours.
Charting Your Course: A Quick-Start Guide to Your Waterwheel Project
Ready to turn that stream into home energy? Here’s a streamlined decision path:
Assess Your Resource: Measure your stream’s flow rate (L/s) and available head (meters). This data is paramount.
Match Wheel to Site:
High Head (>2m) & Moderate Flow: Consider an Overshot or Pitchback for maximum efficiency.
Moderate Head (1-2m) & Good Flow: Breastshot is a strong contender.
Low Head (<1m) & Fast Flow: An Undershot might be your simplest option.
Calculate Potential: Use the Power (Watts) = Flow Rate × Head × 9.81 × Efficiency (0.5-0.7) formula to estimate achievable power.
Permit Research:Before any digging, contact local authorities regarding water rights and construction permits.
Gather Components: Based on your chosen wheel type and estimated power needs, source your wheel materials, shaft, bearings, generator (car alternator or PMG), rectifier, charge controller, battery bank, and inverter. Don’t forget wiring and safety gear!
Build & Install: Follow the steps for building the wheel, support structure, water channeling, and generator connection.
Wire Safely: Implement the electrical system with proper fuses, breakers, and waterproof connections.
Test & Optimize: Run the system, measure output, and make fine adjustments.
Quick Answers: Your Waterwheel Electricity FAQs
How much power can a small stream generate?
A small stream with 10 liters/second flow and 1 meter of head can typically generate 60–100 Watts continuously with an efficient wheel. This can power basic lighting, phone charging, and small electronics.
Are waterwheel generators noisy?
No, modern waterwheel generators are generally very quiet, especially compared to wind turbines or combustion generators. The primary sound is usually just the flowing water itself.
Do I need a battery bank for waterwheel electricity?
While not strictly mandatory if you only want to power immediate loads, a battery bank is highly recommended. It stores excess power, providing continuous electricity during fluctuating water flow or when demand temporarily exceeds generation, creating a more stable and reliable system.
Can I use a car alternator for my DIY waterwheel generator?
Yes, a car alternator is a popular and cost-effective choice for DIY projects. However, it will require a rectifier to convert its AC output (or unregulated DC) to stable DC for battery charging, and you’ll likely need a pulley system to spin it fast enough (500–1,000 RPMs) from a slower waterwheel.
What’s the biggest challenge in building a DIY system?
Often, the biggest challenge isn’t the mechanical construction but navigating local regulations and securing water rights or permits for diverting/impounding water. Always research this thoroughly beforehand.
How long do DIY waterwheel generators last?
With proper design, durable materials, and consistent maintenance, a DIY waterwheel generator can last 15-25 years or even longer. Components like bearings or generators may need replacement sooner, but the core structure and wheel can be very long-lived.
The Continuous Flow of Independence: Your Next Steps in Waterwheel Energy
Harnessing waterwheel electricity is more than just a power solution; it’s an embracing of self-reliance and sustainable living. The journey from a flowing stream to a powered home is an empowering one, full of practical challenges and rewarding successes. By understanding the types of wheels, the essential components, and the step-by-step process, you’re now equipped with the knowledge to begin your own hydro-powered adventure. Take that first step: assess your site, understand the regulations, and start designing a system that can provide continuous, clean energy, anchoring your home in a future of true energy independence.
I am a writer who loves renewable energy, with a focus on sustainable living, renewable energy, and eco-friendly innovation. With a passion for environmental awareness and a desire to explore the latest trends in green technology, corporate sustainability, and climate action. Through in-depth storytelling